Showing posts with label knitting. Show all posts

Friday, August 22, 2014

On the Joys of Adjusting for Gauge

Gauge.

Did you shudder at the sight of the word? Shrink back in fear? I've been knitting for over ten years, and working on a gauge swatch can still fill me with, if not outright terror, at least dread.

Lately, I've been working with a number of contract knitters to produce pieces for my business, and the issue of gauge has arisen. Namely, they weren't able to get the same gauge as I did for a piece, and they didn't know how to adjust for it. Two knitters with whom I'm no longer working didn't even bother to check their gauge, which led to them mailing me pants with a 12-18 mos inseam and a 3-6 mos waist. Oops! A perfect example of why gauge is important.

So - simply put - what is it? Gauge is the number of stitches per inch and rows per inch that your knitting produces. It's affected by how tightly you hold your yarn, how large of needles you're using, or in machine knitting your tension on your carriage and the tension knob. It's a tricky little beast. Typically, a pattern will give you recommended gauge for a 4X4 inch square. Somewhere in the instructions it will say, Gauge = 23 stitches, 34 rows.

All of the instructions in your pattern are based off the math that your gauge gives you. If the size is for a 34" chest knit in the round, the designer will have you cast on 196 stitches* Wait, how did I get that math?

23 stitches/4 inches = 5.75 stitches/inch

5.75 stitches an inch X 34" = 195.5 stitches (rounded it to 196).

Et, voila! So IF you're able to get gauge on your needles for that size, you can cheerfully knit away, following the pattern as you go (though I would recommend measuring occasionally, putting the piece on waste yarn and trying it on at crucial points, etc).

But, um, what if you're me and you knit three different gauge swatches last night and didn't get the correct gauge once? Sigh. Then you have more work to do.

If you're lucky, your pattern will have a chart that indicates what the measurements are supposed to be at key points (the waist, the bust, sleeve length, etc) like this one from KnitScene Summer 2013;

The drawing indicates what measurements should be at the waist, bust, etc. So all you have to do is multiply the measurements by your gauge. For example, if I'm making the smallest size the hips should be 32". In my gauge I got 5.11 stitches/inch instead of what the pattern called for - 5.75 stitches. If I take 32" and multiply it by 5.11 I know that I need cast on 163.52 stitches at the hips.

It's a pain to go through a pattern and re-do all the math, no doubt. Some knitters just chose to wing it, but if you're making a large sweater there's nothing worse than ripping it out and starting all over again. Hopefully this post will help you when you need to make adjustments.

Questions? Ask away in the comments!

-Dena *simple example here, I'm assuming no waist shaping/hip width the same

Monday, February 17, 2014

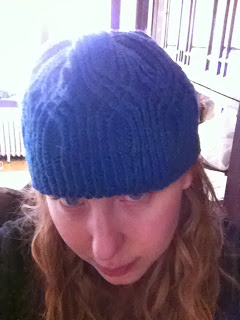
Hallgrim Hat - Interweave Knits 2012 - my latest project

I've posted a few reviews in a row, so I figured it was time to talk about what I've been knitting recently. A hat! Hey, I live in Minnesota, it'll be winter for at least three more months. And I lost my old hat (the Koolhaus hat pattern) somewhere in our house. Losing knitted winter items is a common hazard in this state. So I decided to knit the Hallgrim hat from Interweave Knit's 2012 issue. What can I say, I'm a sucker for cables. And I loved the arched cathedral look to the design.
Like all hats, it was a quick knit, and I found the cable pattern for each row to be easy to memorize. By the second repeat I'd have it down and wouldn't have to consult the pattern again for the rest of the row. Believe it or not, I actually bought the yarn - Filatura de Crosa Sportwool - recommended with the pattern. Usually I stash bust with smaller patterns, but I love the color green. And I'm so happy that I did - the yarn has gorgeous tonal variations in the green and was lovely to knit with. The pictures in the magazine don't do it justice. Here's a link to those photos, where the color looks flat: http://www.knittingdaily.com/media/p/103630.aspx But it's definitely not, in fact when a friend saw me knitting it she commented on the beautiful variations in the yarn. It's difficult to capture that in a photograph, but I'll try.
It took me less than a week to knit up (I was working on other projects, too). I wasn't initially a fan of the shaping at the top - rather than a more graduated decreasing like most hats I've made, all of the decreases were within 8 rows or so. So the top sat on my head kind of 'poofy,' for lack of a better word. But it has settled down a bit after wearing it a few weeks.
I'm torn about attempting the mittens, though I bought enough yarn for both by the time I finish them winter may be over (or close to it). We'll see... - D

Friday, February 3, 2012

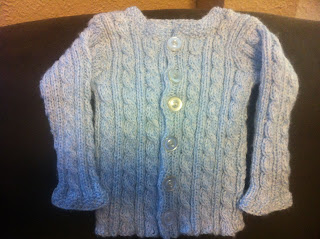
My First Free Pattern - Cabled Baby Sweater

*ahem*  This is my first attempt to create and share my own knitting pattern.  Last week I knitted a set of mittens and hat for Connor, as the weather is getting colder here in Minnesota and he needed something fast.  I liked the cable and rib pattern so much I decided that I'd attempt to expand it into a matching sweater.  Plus, I had a lot of yarn leftover.  So here it is!


Because is there anything more exciting than wearing a sweater your Mommy knit for you?  *G*


My son doesn't think so!

Cabled Baby Sweater 

Materials
Size 3 and Size 4 needles
One skein of Bernat Softee Baby Yarn (I didn't use the whole skein)
Six buttons
Needle and thread for sewing on buttons


Left front
On smaller needles, cast on 36 stitches.
For border k2, p2, k2 across the first 6 stitches.
Then *p2, k4, p2, k2, p2*.  Repeat from * to the end of the row.
On WS knit all knit stitches and purl all purl stitches.  Repeat for six rows.  Switch to larger needles.
On the 6th row (RS) k2, p2, k2 *p2, C4, p2, k2,* repeat from *.

Continue in the rib pattern, working the cable on every 6th row, until the piece measures seven inches.  For me this was just over eight cable repeats.

Shape armhole

Bind off 4 stitches on WS.  Work in pattern to end of row.  Work RS in pattern.  Bind off 1 stitch on WS two more times - 30 stitches remain.  Work in pattern until piece measures nine inches.  For me this was two rows past 11 cable repeats.

Shape neck
On next RS bind off 14 stitches.  Work in pattern until the end of the row.  Work WS in pattern.  Bind off 1 more stitch at neckline (RS) two more times - 14 stitches remain.  Work in pattern until piece measures 11 inches (for me, 12 and a half cable repeats).  Slide remaining 14 stitches onto a holder.

Right front
Cast on 36 stitches.
Reverse the knitting for the left front, with the addition of making a buttonhole every eight rows.
To make a buttonhole, knit to the last six stitches, then k2, yarnover, and then p2tog.

Back
Cast on 72 stitches with smaller needles.
K2, p2, k4, p2 repeat across the first row.
Work six rows in pattern.  On row 6, work Cable 4 across each k4.
Work in pattern for seven inches (for me nine cable repeats).

Shape armhole
Bind off 4 stitches at the beginning of the next 2 rows.
Bind off 1 stitch at beginning of next 2 rows.
Total of 10 stitches bound off.

Work even until you have 9 inches, 13 cable repeats plus four rows. 

Shape neckline
Work 14 stitches, place on a stitch holder.
Bind off 34 stitches, work remaining 14 stitches.
Work four more rows on those 14 stitches, then place on a holder.
Rejoin yarn to 14 stitches from right shoulder.  Work four rows, place on holder. 

Sleeves, make Two
Cast on 34 stitches on smaller needles.

Work six rows in seed stitch, i.e., knit, purl, knit, purl across the row, then on the WS knit all the purls and purl all the knits. Switch to larger needles

Then set up row, k2, p2, k4, p2 across the row.  On WS stay in pattern, knit all knit stitches, purl all purls.  Work for five rows, on 6th row (RS), work Ca4 across all k4's.
Continue in pattern, working the cable on every 6th row, for three inches.

Then increase 1 at the beginning of the next WS and RS row - 2 stitches increased.  Continue in pattern, increasing every eight rows on both sides of sleeves until you have 46 stitches.
Work until piece measures seven and a half inches.
Bind off four stitches at the beginning of the next two rows, 38 stitches.
Bind off one stitch at the beginning of the next two rows, 36 stitches.
Work one row in pattern.  Continue in pattern until sleeve measures 8 inches, then bind off all stitches on the RS.

Finishing
With right sides together, use the three needle bindoff method to join the two front pieces to the back.  At this point I blocked the sweater because it pulls so tight due to the ribbing.

Sew up side seams using mattress stitch.  Sew sleeve seams and sew into holes.  Then pick up 76 stitches from the neckline.  Work six rows in seed stitch, then bind off.  Sew on buttons.

Put on baby and admire your handiwork! 

Here is the back, with C looking over his shoulder to see why Mommy is taking a picture.

Please let me know if you make the pattern, and I'd love to see pictures.
-D

Thursday, January 26, 2012

An Accidental Valentine's Day Sweater

 A few years ago my friend Jaime was selling a lot of her stash on ebay.  Since I've never met a yarn sale I could resist *cough* I bought quite a bit of it.  Into one package she threw four skeins of TLC Macaroon because it hadn't sold, with instructions to make something for my best friend's daughter Lillian.  It was very, very pink.  The yarn has sat in my stash for a while, but this year one of my resolutions is to bust through the pile of yarn that's been sitting in tupperware in my office.  So a few days before Christmas I started this sweater for Lillian;

Um, yeah, did I mention that it's pink? *G*  I was baby-sitting Lillian a few days after I'd started it and she saw me working on it.  "That yarn is very pink, Aunt Dena," she said, sidling up to me.  "Yes, it is," I said.  "I love the color pink."  Bats her eyelashes.  "Do you, now?"  Yes, she's quite the charmer.  When I finished it I went looking for buttons but I couldn't find any that matched the two pinks well enough, and I saw this bag of heart-shaped buttons...so I figured I'd just go with it.  And now Lillian has a Valentine's Day sweater.


I hated working with the yarn - I'm not surprised it was discontinued, because it's coarse and the lighter color pink pulled a lot - but she loves the jacket, and I hope she'll enjoy wearing it on Valentine's Day. 

- D

Monday, January 2, 2012

A Knitter's Pride

So this funny thing happened when I started learning to knit.  I grew strangely ashamed of any of the knitted items that I'd previously purchased.  Not ashamed like I didn't like them anymore, but when friends, acquaintances, and co-workers learn that you knit they start to assume that you made every knitted thing ever.  Which is flattering, sometimes, but means that I get oddly embarrassed to admit, "No, I bought this scarf before I started knitting." 

See?  A knitter's pride :)

What this also means is that, if I could make it, I don't want to buy it.  So when we had a cold snap a few weeks ago and my son needed a hat and mittens I refused to buy them - I mean, everyone would assume I'd made them myself!  I found a quick and easy pattern on ravelry, and here is the result.

Cute and simple, if I do say so myself *g*  After I finished them the weather obliged by snowing (the way it does in Minnesota) and I needed them immediately.  Here's C looking at snow for the first time, wearing his new hat and mittens.
I think he's a little skeptical of the weather *G*

- D

Wednesday, December 28, 2011

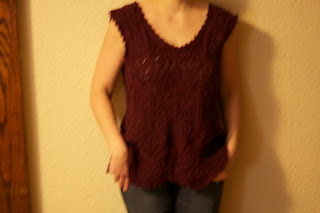
The hardest sweater I've knitted yet!

AKA, the reason that I've been quiet the past few months *g*  About the time that my son was born I ordered some yarn from Knitpicks, Shine Worsted in Currant, that was on clearance, to make this sweater.  It was in the Interweave Knits Spring 2011 issue and I fell in love with it instantly.  It's a modular sweater, which was a new technique for me.  Basically, you knit the first hexagon and then pick up and knit each hexagon off the last one. 


The plus is that you don't have to seam anything, the minus is that you have a lot of ends to sew in.  It took me about six months to finish, but I think the results were worth it.  See for yourself;


Because of the lace details in this hexagon this top has to be worn with a camisole underneath or, in my case, a long sleeve tee for the winter.  I've already received two compliments on it when wearing it out and about, however.  I don't know about you guys but I love getting compliments on anything I've hand-knitted, it helps validate all the time I put into a project!  The finishing on this one took a while - after knitting all those hexagons I had to pick up and knit the bobble bind off along the neck and bottom and the cap sleeves.  They add really nice interest, though. 

As soon as I finished it, though, I decided to focus on smaller projects for the rest of the year.  It was worth the time investment, but balancing my knitting between large and small projects keeps me entertained.
- D

Friday, July 22, 2011

And the winner is....

Mamculuna! 

Send me a private message with your address and I'll mail the knitting needle roll off on Monday *g*

Thank you, everyone, for entering, and rest assured, there will be other contests!

- D

Tuesday, July 19, 2011

Stash Busting, Pt 2

Yes, another pair of socks.  What can I say?  They're fast, they generally only use one skein of yarn, and I can give someone something useful when they're done.  Of course, since this pattern is called "Baby's First Sock" I mistakenly though I'd gift it to someone with a newborn.  Ha!  They fit my best friend's three year old.  The pattern is from Interweave Knits Accessories 2009 issue, which I love.  I've made five of the patterns in this issue, which is a lot for me.  This was the first pair of socks that I've made that, instead of using short rows to shape the heel, just had me bind off using the three needle bind off method.  It was certainly easier.  Here are the socks;


As you can see from the skein at the top of the photo, the pattern didn't use as much yarn as I'd hoped!  I think I have enough left to make another pair.  I finished the socks last night, and I also finished the yellow and blue bag I've been working on for about a week.  I love this material - it screamed 'summer!' at me from across the store - though there's no denying that it's bright. 

Which I, of course, played up with the teal and yellow contrasting fabric.  I thought that this time I'd take some pics of my process, and the bag as it was being made.  Here's a shot of the interior;

It doesn't look like much, but on the left side is a pocket, next to it is an elasticized pouch, them five spaces for DPN needles and another pocket.  I have to sew it all flat before I assemble the bag and it becomes this;

(Recognize the yarn? *g*).  Similarly, when I'm sewing spaces for longer needles I use actual needles to mark where I'm going to sew.


That way I can be sure that I have the appropriate fullness of material between the pins.  As you can see, I have a fondness for bamboo needles.  All of this work goes into creating the bag's interior.


But since it's 90-something out and there's no A/C in my sewing room I won't be doing any more sewing today!  I'm going to hang out on the couch in the living room in front of our window unit & read a book, instead.

- D

Friday, July 8, 2011

Contest! Win a Free Knitting Needle Roll!

It's my first giveaway!  Enter to win a pink/brown toile knitting needle roll!


The roll measures approximately 10 inches high and 15 wide when laid flat.


It has individually sewn pockets for up to 17 pairs of needles - pockets grow in size from left to right.


And it fastens with a lovely pink satin ribbon. 

Entering to win is easy!  There are four ways to enter, and each counts as one entry into the contest.

1)  Leave a comment on this post.  That's easy!
2) Follow this blog (note: those of you who already follow me are entered to win automatically)
3) Link to this blog entry on facebook (send me a DM if you're afraid I'll miss it)
4) RT this post in a tweet

Each time you do one of the above, you're entered!  Simple as that *g*  Contest is open to residents of the US and Canada.  Contest closes in two weeks - July 22nd - at 5pm.  Winner will be posted here, so check back!

Good luck, everyone!
- D

Polka Dot Fun

Lately every time I've been at the fabric store I've been drawn to bright, cheerful colors and prints.  It must be because it's been sunny and hot here.  And I've been having a lot of fun playing with that color when I sew.  For example, on this bag I played on the colors in the polka dots with both my contrasting fabric and my zippers and thread. 


The pocket is reddish-orange reclaimed linen (it was a tablecloth!) and the zipper is white.  Elsewhere on the bag I used yellow thread that pops against the red.  On the inside I did something different - there are two places to store needles.  One is for longer needles - I created a place along the bag's side like this;

For four needles, and I also sewed places to slide five DPN needles next to the elasticized pouch.

I dropped the spaces lower than the pouch's height so that the needles wouldn't get lost *g*  Since there's a place on the other side of the pouch for a circular needle this bag is perfect for those projects like hats where you switch between circular and DPN's.   Because this bag has two zippered pouches, plus some of the interior features took more time, it's slightly more than the pink/brown bag.  But I just love it - it's so cheerful that seeing it hanging in my sewing room makes me smile every time!

- D
 ps - if you're interested, this bag is up for sale at www.denastolldesigns.etsy.com!

Monday, July 4, 2011

Stash-busting!

My goal this summer has been stash busting.  I have a lot of leftover yarn from various projects, a half skein here, a skein there...and I'm running out of storage room!  Plus knitpicks is having a sale and I want to buy more ;)  I usually try to alternate bigger projects with smaller stuff but after becoming thoroughly frustrated with a sweater pattern riddled with errors I decided to go for stash busting instead.  My first project was the Dayflower Scarf, my second were these socks;


I find that I prefer knitting children's socks to knitting socks for adults - with adult socks it takes too long and I'm bored by the time I finish the first one.  I used knitpicks Swish worsted yarn, and I love the blue color.  Hopefully they'll fit by winter!  I still have a half skein left, so I'm debating seeing if I have enough to make another pair if I shorten the leg.  The pattern is free - Classic Elite Cabled Baby Socks - and quick, it only took me a day for each sock (knitting in front of the TV at night).  I think I want to knit more baby socks - does anyone else have a favorite pattern they'd like to share?

- D

Tuesday, June 21, 2011

Welcome!

I am a stay-at-home Mom who loves to knit and sew.  My passion for both hobbies led me to designing and sewing my own knitting bags.  Everything out there on the market didn't have enough pockets for me, or I didn't like the print, or it was too expensive, so I took my picky self to the fabric store and went to work.  The result was Dena Stoll Designs. 

Since I also love talking about my works in progress I created this blog to feature my bags and whatever project (or projects!) is currently on the needles.  I'll be posting photos of my knitting bags, and running contests and giveaways.  More details to come.  For now, thanks for stopping by, and Happy Knitting!